ListTemplateId - :
100 – Generic List
101 – Document Library
102 – Survey
103 – Links List
104 – Announcements List
105 – Contacts List
106 – Events List
107 – Tasks List
108 – Discussion Board
109 – Picture Library
110 – Data Sources
111 – Site Template Gallery
112 – User Information List
113 – Web Part Gallery
114 – List Template Gallery
115 – XML Form Library
116 – Master Pages Gallery
117 – No-Code Workflows
118 – Custom Workflow Process
119 – Wiki Page Library
120 – Custom grid for a list
130 – Data Connection Library
140 – Workflow History
150 – Gantt Tasks List
200 – Meeting Workspace Series List
201 – Meeting Workspace Agenda List
202 – Meeting Workspace Attendees List
204 – Meeting Workspace Decisions List
207 – Meeting Workspace Objectives List
210 – Meeting Workspace text box
211 – Meeting Workspace Things To Bring List
212 – Meeting Workspace Pages List
301 – Blog Posts List
302 – Blog Comments List
303 – Blog Categories List
1100 – Issue Tracking
1200 – Administrator Tasks List
Wednesday, October 7, 2009
Sunday, August 23, 2009
Sharepoint PropertyBag
Sharepoint comes with handfull of option to store the information with ease.When we are thinking about storing configuration information then first item comes to our mind is web.config.But when we look at sharepoint perspective, there is one more usfull option called propertybag is available.It can store the information at different levels such as
SPWeb exposes two properties to store the information one is AllProperties which equivalent to a hashtable and supports case sensitive keys.Second one is properties (PropertyBag) and no supports for case sensitive keys.
using (SPSite site = new SPSite(SPContext.Current.Web.Url))
{
using (SPWeb web= site.OpenWeb()) {
// Add a property entry
web.Properties[key] = value;
web.AllProperties[key] = value;
web.Update();
web.Properties.Update();
// Remove a property entry
web.AllProperties.Remove(key);
web.Properties[key] = null;
web.Update();
web.Properties.Update();
}
}
We can also serialize the object and store in the propertybags.Sounds cool !!
You can download Property bag settings from http://pbs.codeplex.com/ and more details about managing configuration information http://spg.codeplex.com/Wiki/View.aspx?title=Managing%20Application%20Configuration&referringTitle=Home
• FarmSo we can share the information across different web where a list failed to do that and also able to persist information across farm.
• Server
• Web Application
• Site Collection
• Site
• List
SPWeb exposes two properties to store the information one is AllProperties which equivalent to a hashtable and supports case sensitive keys.Second one is properties (PropertyBag) and no supports for case sensitive keys.
using (SPSite site = new SPSite(SPContext.Current.Web.Url))
{
using (SPWeb web= site.OpenWeb()) {
// Add a property entry
web.Properties[key] = value;
web.AllProperties[key] = value;
web.Update();
web.Properties.Update();
// Remove a property entry
web.AllProperties.Remove(key);
web.Properties[key] = null;
web.Update();
web.Properties.Update();
}
}
We can also serialize the object and store in the propertybags.Sounds cool !!
You can download Property bag settings from http://pbs.codeplex.com/ and more details about managing configuration information http://spg.codeplex.com/Wiki/View.aspx?title=Managing%20Application%20Configuration&referringTitle=Home
Tuesday, August 11, 2009
Disable IE Enhanced Security for Windows 2008
When you are using windows 2008 as your workstation, then IE Enhanced security will be a burden for you.You can easily disable this.
Step 1 : Go To Server Manager
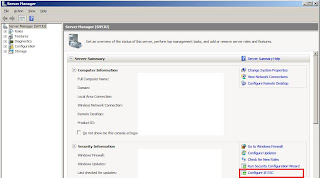
step2 : Turn Off the Security

Step 1 : Go To Server Manager

step2 : Turn Off the Security

Saturday, July 25, 2009
OWSSVR.DLL IN MOSS 2007
OWSSVR.DLL is used in SharePoint Designer for FP-RPC (Front Page – Remote Procedure Call).Now its getting depricated in each release.
Following are some of dpecricating OLD DLL usage.
1. Returning all data for a SharePoint list, including its XSD - http://[localhost]/_vti_bin/owssvr.dll?Cmd=Display&List={ListGuid}&Query=*&XMLDATA=TRUE
2.Rreturning data of SharePoint list based on a specific view from the list -http://[localhost]/_vti_bin/owssvr.dll?Cmd=Display&List={ListGuid}&View={ViewGuid}&XMLDATA=TRUE
3.Returning List definition - http://[localhost]/_vti_bin/owssvr.dll?Cmd=ExportList&List={ListGuid}
4. Retrieving ONET.XML - http://[localhost]/_vti_bin/owssvr.dll?Cmd=GetProjSchema
5. Retrieving field types - http://[localhost]/vti_bin/owssvr.dll?Cmd=GetProjSchema&SiteTemplate=fldtypes
OWSSVR.DLL workes based on httpget so you can use that in your javascript
<script>
function GetList()
{
// -- getting the filtered lookup
var reqstring = siteName + "/_vti_bin/owssvr.dll?CS=109&XMLDATA=1&RowLimit=0&List=" + lookupListName + "&View=" + lookupViewName;
var req = new ActiveXObject("MSXML2.XMLHTTP");
req.open("GET",reqstring,false);
req.send();
// -- loading response in XML Document
var doc = new ActiveXObject("MSXML2.DOMDocument");
doc.loadXML(req.responseText);
var data = doc.documentElement.childNodes(1);
for (i=0;i<data.childnodes.length;i++)
{
}
}
</script>
Thursday, July 23, 2009
Code Access Secuity in Sharepoint
Writing a web part or web service may not be a big issue but deploying them is certainly a headache. You start getting permission errors as soon as you deploy your code on the server.
You will get following error
Request for the permission of type 'Microsoft.SharePoint.Security.SharePointPermission, Microsoft.SharePoint.Security, Version=12.0.0.0, Culture=neutral, PublicKeyToken=71e9bce111e9429c' failed.
There are three ways to assign execution permissions to your code:
1. Increase the trust level for the entire virtual server
2. Create a custom policy file for your assemblies
3. Install your assemblies in the GAC
Wednesday, July 22, 2009
Creating Sharepoint ContentType with specified GUID
Type contentType = typeof(SPContentType);
Type paramType = typeof(SPContentTypeId);
Type[] paramArray = { paramType };
ConstructorInfo consInfo = contentType.GetConstructor(BindingFlags.Instance BindingFlags.NonPublic, null, CallingConventions.Any, paramArray, null);
object[] paramsX = { new SPContentTypeId(contentTypeID) };
SPContentType contentTypeObject = consInfo.Invoke(paramsX) as SPContentType; contentTypeObject.GetType().InvokeMember("Web", BindingFlags.NonPublic BindingFlags.Instance BindingFlags.SetProperty BindingFlags.IgnoreCase, null, contentTypeObject, new object[] { targetWeb }); contentTypeObject.GetType().InvokeMember("Collection", BindingFlags.NonPublic BindingFlags.Instance BindingFlags.SetProperty BindingFlags.IgnoreCase, null, contentTypeObject, new object[] { targetWeb.ContentTypes }); return contentTypeObject;
Calling Internal Property of Class through Reflection
Type contentType = typeof(SPContentType);
Type paramType = typeof(SPContentTypeId);
Type[] paramArray = { paramType };
ConstructorInfo consInfo = contentType.GetConstructor(BindingFlags.Instance BindingFlags.NonPublic, null, CallingConventions.Any, paramArray, null);
object[] paramsX = { new SPContentTypeId(contentTypeID) };
SPContentType contentTypeObject = consInfo.Invoke(paramsX) as SPContentType; contentTypeObject.GetType().InvokeMember("Web", BindingFlags.NonPublic BindingFlags.Instance BindingFlags.SetProperty BindingFlags.IgnoreCase, null, contentTypeObject, new object[] { targetWeb }); contentTypeObject.GetType().InvokeMember("Collection", BindingFlags.NonPublic BindingFlags.Instance BindingFlags.SetProperty BindingFlags.IgnoreCase, null, contentTypeObject, new object[] { targetWeb.ContentTypes }); return contentTypeObject;
Type paramType = typeof(SPContentTypeId);
Type[] paramArray = { paramType };
ConstructorInfo consInfo = contentType.GetConstructor(BindingFlags.Instance BindingFlags.NonPublic, null, CallingConventions.Any, paramArray, null);
object[] paramsX = { new SPContentTypeId(contentTypeID) };
SPContentType contentTypeObject = consInfo.Invoke(paramsX) as SPContentType; contentTypeObject.GetType().InvokeMember("Web", BindingFlags.NonPublic BindingFlags.Instance BindingFlags.SetProperty BindingFlags.IgnoreCase, null, contentTypeObject, new object[] { targetWeb }); contentTypeObject.GetType().InvokeMember("Collection", BindingFlags.NonPublic BindingFlags.Instance BindingFlags.SetProperty BindingFlags.IgnoreCase, null, contentTypeObject, new object[] { targetWeb.ContentTypes }); return contentTypeObject;
Calling internal constructor of a class through Reflection
Type contentType = typeof(SPContentType);
Type paramType = typeof(SPContentTypeId);
Type[] paramArray = { paramType };
ConstructorInfo consInfo = contentType.GetConstructor(BindingFlags.Instance BindingFlags.NonPublic, null, CallingConventions.Any, paramArray, null);
object[] paramsX = { new SPContentTypeId(contentTypeID) };
SPContentType contentTypeObject = consInfo.Invoke(paramsX) as SPContentType; contentTypeObject.GetType().InvokeMember("Web", BindingFlags.NonPublic BindingFlags.Instance BindingFlags.SetProperty BindingFlags.IgnoreCase, null, contentTypeObject, new object[] { targetWeb }); contentTypeObject.GetType().InvokeMember("Collection", BindingFlags.NonPublic BindingFlags.Instance BindingFlags.SetProperty BindingFlags.IgnoreCase, null, contentTypeObject, new object[] { targetWeb.ContentTypes }); return contentTypeObject;
Type paramType = typeof(SPContentTypeId);
Type[] paramArray = { paramType };
ConstructorInfo consInfo = contentType.GetConstructor(BindingFlags.Instance BindingFlags.NonPublic, null, CallingConventions.Any, paramArray, null);
object[] paramsX = { new SPContentTypeId(contentTypeID) };
SPContentType contentTypeObject = consInfo.Invoke(paramsX) as SPContentType; contentTypeObject.GetType().InvokeMember("Web", BindingFlags.NonPublic BindingFlags.Instance BindingFlags.SetProperty BindingFlags.IgnoreCase, null, contentTypeObject, new object[] { targetWeb }); contentTypeObject.GetType().InvokeMember("Collection", BindingFlags.NonPublic BindingFlags.Instance BindingFlags.SetProperty BindingFlags.IgnoreCase, null, contentTypeObject, new object[] { targetWeb.ContentTypes }); return contentTypeObject;
Wednesday, July 15, 2009
Deploying Solution Package Using STSADM
Now there are different way you can deploy your solution package into sharepoint.If you are looking for WSP Builder Project You can download it from following link http://wspbuilder.codeplex.com/Release/ProjectReleases.aspx?ReleaseId=24627 .Its a visual studio extension.
Playing with STSADM for solution deployment
we can use our sweet and dirty comandline tool STSADM.
You can find stsadm.exe in C:\Program Files\Common Files\Microsoft Shared\web server extensions\12\BIN
Solution Pack Deployment
Step1 : Add the solution pack (Only added solution pack can be deployed)
stsadm -o addsolution -filename
example : stsadm -o addsolution -filename c:\ShyjumohanBlog.wsp
Step2 : Deploy the solution pack
stsadm -o deploysolution -name
example : stsadm -o deploysolution -name ShyjumohanBlog -immediate -allcontenturls -allowgacdeployment -allowcaspolicies
Parameter usage
-immediate - Going deploy it immediately
-allowgacdeployment - WSP pack contains some dll's which should goes to GAC.
If you need to delete a solution pack use the following command
Step1 : Retracts the specified solution’s deployment.
stsadm -o retractsolution -name -immediate -allcontenturls
example : stsadm -o retractsolution -name ShyjumohanBlog -immediate -allcontenturls
The retractsolution operation removes files from the front-end Web server
Step2: Delete the solution
stsadm -o deletesolution -name
example : stsadm -o deletesolution -name ShyjumohanBlog
The deletesolution operation deletes the solution package in the solution store of the configuration, and should only be called after solution packages have been retracted.
Cheers
Shyju Mohan
Saturday, July 4, 2009
How to creat Custon List -MOSS 2007 (Sharepoint)
As a sharepoint developer or administrator its a common task to create list.Let see how to create sharepoint List.
Step 1.Go to your sharepoint site in which you plan to create a list.Click on Site Action Menu (Top right side).Then Click on the Site Settings sub menu.

Step 2.In site settings page go to Site Administration section and click on Site Libraries adn Lists.

Step 3.In next page you can choose either you are going to create a New content or customizing existing content like announcement,calendar,tasks etc (predefined lists).We are going to click on Ne Content.

Step 4.Next step is to choose what kind of new content we need to create from the set of differe groups like Libraries,Communicvations,Tracking,Custom list web pages.We are going to choose custom List.

Step 5.In List creation Page specify the name for the list which we are going to create.Give some meaningfull name.

Step 6.Specify whether we need a new link for this list in quick launch menu which appear in left side of the site.If choose yes a new link will be added to the quick launch.

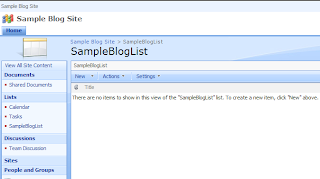
Step 7.After successfull creation of list you will redirected list page as follows.
Step 1.Go to your sharepoint site in which you plan to create a list.Click on Site Action Menu (Top right side).Then Click on the Site Settings sub menu.

Step 2.In site settings page go to Site Administration section and click on Site Libraries adn Lists.

Step 3.In next page you can choose either you are going to create a New content or customizing existing content like announcement,calendar,tasks etc (predefined lists).We are going to click on Ne Content.

Step 4.Next step is to choose what kind of new content we need to create from the set of differe groups like Libraries,Communicvations,Tracking,Custom list web pages.We are going to choose custom List.

Step 5.In List creation Page specify the name for the list which we are going to create.Give some meaningfull name.

Step 6.Specify whether we need a new link for this list in quick launch menu which appear in left side of the site.If choose yes a new link will be added to the quick launch.

Step 7.After successfull creation of list you will redirected list page as follows.

How to Create Site Coloumn- MOSS 2007
When we are developing sharepoint application its quiet common that we need to add site coloumns.So we can create our own cloumn for a share point list or document library or Content Type.Following steps will show how to create a site coloumn
Step 1. Goto to your sharepoint site and click on the site action menu (top right side)

Step 2.Click on the Site Setting Sub Menu.
Step 3.In Site settings page Go to Gallery Section and Click on Site Coloumn Link

Step 4.In Site Coloumn Gallary page you can see all the existing site coloumns.Next you have to click on the creat link in site coloumn gallery page.

Step 5.In site coloumn Create page specify the coloumn name you want to create

Step 6.Specify the type of Coloumn we are going to create.Here we are going to create a lookup coloumn.

Step 7.Specify the group under which this new site coloumn should go.You can add new group so it will help to identify the our coloumn.Give a meaning full busines group name or project name.

Step 8.Specify this will be a required coloumn.(suppose we added this coloumn into a list and saying this is required coloumn)

Step 9.Now we are going to specify our source list for theis lookup coloumn.Specify a list from the drop down.Look at my BlogHow to create list.

Step 10.Next we are going to specify which will be the coloumn in the source list being use as the source coloumn for this lookup coloumn.

Step 11.Specify this lookup coloumn supports mutiple value from the source coloumn.

Step 12.After sucessfull you will see the following screen, in which you can see the new cloumn created under a new group we specified.

Cheers
Shyju Mohan
MOSS 2007 - Creating a Site Collection
Let see how to create a site collection and base site or Top level site for site collection.
Step 1 . Go To Sharepoint Central Admin

Step 2 . Go To Application Management Tab in Sharepoint Central Admin

Step 3 .Go to Site Management section and click on Create Site Collection

Step 4 .In Site creation page Select the Web application in which site is going to run.So it will use the same content DB of the specified web application.

Step 5 .Specify the title for the site.So that name will come as the site title.

Step 6 .Specify the URL for the site.If it is not base site then specify some meaning full name.

Step 6 .In this step you have to decide what kind of template i am going to use for mysite.There many template are available choose the appropriate one suites your business scenario.
Template Group Collaboration
This group contains template which suits your collboration need in your organization.Sites like Team collaboration,Wiki,Blog,Colloborative Document Workspace are available in this Group.

Template Group Meetting
This group Provides template for meeting includes basic meeting,social meeting,decision making meeting etc.

Template Group Enterprise
This group Provides template for catering some of the needs in enterprise functional need.Sites like Recod center,Report Center,Document Center etc

Template Group Publication
This group Provides template for creating publcation portal for your internet facing sites.

Step 7 .You have specify which user will be the administrator of the site.Specify the user which is going to do the administrative job for this site.
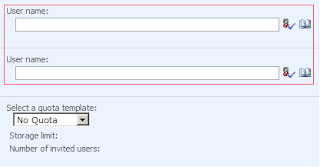
Step 7 .Specify the quota for the site.There by you can limit the growth of the site.

Step 8 .Submit the site creation form.After Successfull creation you will see following screen.

If you need to look at how to create web application Look at my BlogHow to Create Web Application
How to Create or extend Web applications
When you are playing with sharepoint first you have to create a web application to play with.Let see how we can create a webapplication in sharepoint
Step1 . Goto Sharepoint Central Admin Site

Step 2 . Goto Application Management Tab

Step 3. Click on Create or Extend Web Application Link

Step 4. Click on Create New WebApplication
In the web application creation you have to specify the different details for your Convenience.

Step 6 . Specify the port above 1500 (You can specify some port number which is easy to remeber.

Step 7 . Specify the Application Pool Name .Give some meaning full name so you can identify your application Poll easily.

Step 8. Specify the user name and password under which Application Pool is going to run(Try to Use windows Service User).

Step 9. Specify the Content DB name so you easily identify your content DB for the specific web application.By Default it will give some junk name

Step 10. Specify authentication Mode in which you want to communicate with Database.You can go for windows authentication (uses the application pool identity use) or you can specify the specific Sql Server user name and password.
Step 11. Submit the Web application creation form.

step 12 . You will see the above screen if it is successfully created.
You can see how to create a site collection in my Blog How to create site collection
Cheers
Shyju Mohan
Friday, July 3, 2009
Site Coloumn As Feature
How To Create a Feature
As a first step you you have to add a subfolder containing a Feature definition(Feature.xml) within the Features setup directory (Local_Drive:\Program Files\Common Files\Microsoft Shared\web server extensions\12\TEMPLATE\FEATURES). Feature.xml file defines the base properties of the Feature and lists elements bound to it. The Feature element is used in a Feature.xml file to define a Feature and to specify the location of assemblies, files, dependencies, or properties that support the Feature
Create a Site Coloumn Feature
1. Create a new folder called "SampleBlogColoumn" under C:\Program Files\Common Files\Microsoft Shared\Web Server Extensions\12\Template\Features\.
2.Create a new file called features.xml containing:
<Feature Id="F5E3FEE8-1D9B-4b95-848B-7614D638B90D" Title="Sample Bloge Site Columns" xmlns="http://schemas.microsoft.com/sharepoint/" Description="Shyju mohan's Sample Site Columns" version="1.0.0.0" scope="Site" hidden="FALSE">
<ElementManifests>
<ElementManifest Location="elements.xml">
</ElementManifests>
</Feature>
This feature.xml will describe about our new site column feature.This file should be placed in the folder created in previous step.
3. Create a new file called elements.xml
<?xml version="1.0" encoding="utf8"?>
<Elements xmlns="http://schemas.microsoft.com/sharepoint/">
<Field ID ={94EF4E88-A8AE-4b11-8110-DEE7B2CE4D41} Name="PersonName"
SourceID="{9c8a1ac8-fe75-4d7d-87af-e1de3e1b82e6}" StaticName="PersonName" Group="BlogSample"
Type="Text" DisplayName="Person Name"/>
<Field ID ={95EF4E88-A8AE-4b11-8110-DEE7B2CE4D41} Name="Age"
SourceID="{9c8a1ac8-fe75-4d7d-87af-e1de3e1b82e6}" StaticName="Age" Group="BlogSample"
Type="Text" DisplayName="Age"/>
<Field ID ={96EF4E88-A8AE-4b11-8110-DEE7B2CE4D41} Name="Salary"
SourceID="{9c8a1ac8-fe75-4d7d-87af-e1de3e1b82e6}" StaticName="Salary" Group="BlogSample"
Type="Number" DisplayName="Salary"/>
</Elements>
This element.xml will describe each coloumn in our feature.This file should be placed in the folder created in previous step.Now we are ready to deploy our feature.Assumes already know about the tool STSADM (Exe tool runs from the command propmpt).We can use stsadm to deploy our feature
4. Open a command prompt and type the following:
CD C:\Program Files\Common Files\Microsoft Shared\Web Server Extensions\12\bin
stsadm -o installfeature -file SampleBlogColoumn
Above command will install the feature.Next step is to activate the feature so we can go for command prompt again or sharepoint central administration site to activate the feature.
5.Again in command prompt and type the following:
stsadm -o activatefeature -file SampleBlogColoumn -url http://localhost/
Further Reading Content Type as Feature
Cheers
Shyju Mohan
Create ContentType as a Feature
Some times it will be necessary to deploy contenttype as a feature.If you are new to ContentType then follow my previous POST.
How To Create a Feature
As a first step you you have to add a subfolder containing a Feature definition(Feature.xml) within the Features setup directory (Local_Drive:\Program Files\Common Files\Microsoft Shared\web server extensions\12\TEMPLATE\FEATURES). Feature.xml file defines the base properties of the Feature and lists elements bound to it. The Feature element is used in a Feature.xml file to define a Feature and to specify the location of assemblies, files, dependencies, or properties that support the Feature
Create a ContentType Feature
First step create the desired coloumn as a feature Follw My BlogCreate Site Coloumn As Feature
1. Create a new folder called "SampleBlogContetType" under C:\Program Files\Common Files\Microsoft Shared\Web Server Extensions\12\Template\Features\.
2.Create a new file called features.xml containing:
3. Create a new file called elements.xml
<?xml version="1.0" encoding="utf8"?>
<Elements xmlns="http://schemas.microsoft.com/sharepoint/">
<ContentType ID ="0x0110035A5E402D9B4EAAC0049A3554D81" Name="BlogPerson"
Version='1' Group="BlogSample"/>
<FieldRefs>
<FieldRef ID ="{95EF4E88-A8AE-4b11-8110-DEE7B2CE4D41}" Name="PersonName"/>
<FieldRef ID ="{95EF4E88-A8AE-4b11-8110-DEE7B2CE4D41}" Name="Age"/>
<FieldRef ID ="{96EF4E88-A8AE-4b11-8110-DEE7B2CE4D41}" Name="Salary"/>
</FieldRefs>
</ContentType>
</Elements>
4. Open a command prompt and type the following:
CD C:\Program Files\Common Files\Microsoft Shared\Web Server Extensions\12\bin
stsadm -o installfeature -file SampleBlogContetType
5.Again in command prompt and type the following:
stsadm -o activatefeature -file SampleBlogContetType -url http://localhost/
Cheers
Shyju Mohan
How To Create a Feature
As a first step you you have to add a subfolder containing a Feature definition(Feature.xml) within the Features setup directory (Local_Drive:\Program Files\Common Files\Microsoft Shared\web server extensions\12\TEMPLATE\FEATURES). Feature.xml file defines the base properties of the Feature and lists elements bound to it. The Feature element is used in a Feature.xml file to define a Feature and to specify the location of assemblies, files, dependencies, or properties that support the Feature
Create a ContentType Feature
First step create the desired coloumn as a feature Follw My BlogCreate Site Coloumn As Feature
1. Create a new folder called "SampleBlogContetType" under C:\Program Files\Common Files\Microsoft Shared\Web Server Extensions\12\Template\Features\.
2.Create a new file called features.xml containing:
<Feature Id="3B4752E6-8D62-4df0-A4D3-31C8E99D44FC" Title="Blog Sample Content Type" xmlns="http://schemas.microsoft.com/sharepoint/" Description="Shyju Mohan's Sample Content Type" version="1.0.0.0" scope="Site" hidden="FALSE">
<ElementManifests>
<ElementManifest Location="elements.xml">
</ElementManifests>
</Feature>
3. Create a new file called elements.xml
<?xml version="1.0" encoding="utf8"?>
<Elements xmlns="http://schemas.microsoft.com/sharepoint/">
<ContentType ID ="0x0110035A5E402D9B4EAAC0049A3554D81" Name="BlogPerson"
Version='1' Group="BlogSample"/>
<FieldRefs>
<FieldRef ID ="{95EF4E88-A8AE-4b11-8110-DEE7B2CE4D41}" Name="PersonName"/>
<FieldRef ID ="{95EF4E88-A8AE-4b11-8110-DEE7B2CE4D41}" Name="Age"/>
<FieldRef ID ="{96EF4E88-A8AE-4b11-8110-DEE7B2CE4D41}" Name="Salary"/>
</FieldRefs>
</ContentType>
</Elements>
4. Open a command prompt and type the following:
CD C:\Program Files\Common Files\Microsoft Shared\Web Server Extensions\12\bin
stsadm -o installfeature -file SampleBlogContetType
5.Again in command prompt and type the following:
stsadm -o activatefeature -file SampleBlogContetType -url http://localhost/
Cheers
Shyju Mohan
Tuesday, April 28, 2009
Sharepoint My Site "The File Exists" Error - AD User recreation issue with my site
Root Cause Of the Issue
when an AD deleted and recreated user try to access their "my site", they will receive "The File Exists" error
Solution 1- Using Sharepoint Administration
a. Go to SharePoint Central Administration site.
b. On the SSP admin page, select "User profiles and properties" "View User Profiles"
c. Search for the user . Click user name and select "Manage Personal Site"
Remove user from the site collection
a. Click "People and Groups"
b. In the "Groups" section, click on the "Owners" group
c. Check the user and select "Actions Remove Users from Group"
Repeat (a) - (c) for each group.
d.Click "Site Permissions" and select "Settings Site Collection Administrators"
e. Add the farm account as a site collection adminsitrator and delete/remove the user.
f. In "People and Groups" screen, click "People" and delete/remove user.
Add the user to the site collection
a. Click "Site Permissions"
b. Select "Settings Site Collection Administrators"
c. Add the user as a site collection adminsitrator. delete the farm account that was added in the previous steps.
if you have guts and confident to play with sharepoint content DB then you will love following alternative way.
Solution 2
Run the following script in the SQL Server against my site's content database (ex: wss_content_Mysite)
To see the list of site url and and there site id you can run the following script
select s.id,w.fullurl from sites s inner join webs w on s.rootwebid = w.id
Following script will do the trick
declare @idVal varchar(200),@sidOldVal varchar(200),@sidNewVal varchar(200)
--Following line will return the site id for the mysite
set @idVal = select s.id from sites s inner join webs w on s.rootwebid = w.id and w.fullurl = "personal/shyjumohan" -- Mysite url
--following line will return old sid value for the user,here we are selecting the sid based ion mysite id and username so it will return the old value .User can be there for multiple site so the top 1 is used
set @sidOldVal = select top1 tp_systemid from userinfo where tp_login = 'ustr\shyjumohan' and tp_siteid = @idVal --tp_login = 'Domain\username'
--following line will return new sid of the user,here we omitted old sid
set @sidNewVal = select top1 tp_systemid from userinfo where tp_login = 'ustr\shyjumohan' and tp_systemid != @sidOldVal --tp_login = 'Domain\username'
select @sidOldVal, @sidNewVal
--make sure you r getting proper value then un comment the following line and run it
--update userinfo set tp_systemid = @sidNewVal where tp_systemid =@sidOldVal
its intresting write?:)
Subscribe to:
Posts (Atom)